

This is what the table looked like when I bought it except a little more faded. I got it from a yard sale and I hated the colors in my kitchen. I use it as a snack table for my little one. It was ugly and a little bit of a pain to clean so I spray painted it. That made it worse because any food that was stuck on would chip the paint so I wanted a better solution, and this is the result.


I washed it down and took it apart, 8 whole screws. Very easy but be careful of the plastic screw covers I broke one and had to glue it on at the end.

 Spray painted it with a really cheap plain black spray paint. I would say about a can and a half. While the paint was drying I used a staple gun to attach fabric and then vinyl covering for easy clean ups. I bought the vinyl at Walmart in the fabric department.
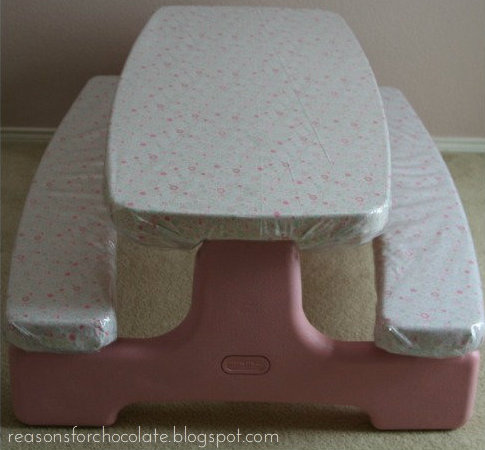
 Here they are all finished in no time. Just a little tricky because the edges are rounded but I muddled through. And here is a pic of after I put it all back together. He couldn't wait to use it! Now I just need to get a better rug for underneath :)
Someone else did my project!
If you would like me to post a picture of your Picnic Table Redo E-mail it to me here: CarolinesCraftyCorner@yahoo.com I would love to post it!
From: Faith W. Cute little froggies

 |
| From: Codi S. One for play one for school |
 |
| From: Cheri C wow love those colors |
 |
| From: Just Me and My Guys |
 |
| From: Happenings of the Harper Household |
 |
| From: Erica R My personal friend :) |
 |
| From: April M chevron loveliness |
 |
| Jami did a great tutorial of her own. |
 |
| From: Nicole L. Love those those polka dots |
 |
| From: Samantha so fun! |
 |
| From: Lindsey J. Fitted sheet and blue paint for Broncos Boise State napkins for the design,so thrifty! |
 |
| From: The family in apartment 5 |
 |
| From: Amy Lee |
 |
| From: Chelsea H. Awesome table! |
 |
| From: Kasi B Stunning! |
 |
| From: Amber Great Job! |
 |
| From: Kelly K. This is ADORABLE! |
 |
| From : Leanne's creative creations |
 |
| From: Patty at Reasons for Chocolate |
 |
| From: Ryleigh's Mom, very designer looking. |
 |
| From: Angela B. Oh so cute! |
 |
| From: Khrystina R. I LOVE the Skulls and Pink!!! |
 |
| From: Tasha M. Apples to go with her kitchen. |
 |
| From: Danielle Amazing transformation! |
.jpeg) |
| From: Chantelle fun fun fun! |
 |
| From: Ana F. Love the colors. |
 |
| From: Andrea E. sweet and simple |
 |
| From: Anonymous Pink and Camo |
 |
| From: Beth B loving those colors! |
 |
| From: Debra nautically awesome! |
 |
| From: Sara C blue paisleys very calming |
 |
| From: Codi H lovely in leather |
 |
| From: Marie E see through lace vinyl over top of color fabric love it! |
 |
| From: Sarah J fun in the city! |
 |
| From: Debrah W Oh my heck that's cute! |
 |
| From: Lori SN I love The Little Mermaid great job! |
 |
| From: Jennifer G she tried to paint hers too and almost threw it out |
 |
From: Tracy G. Looks great on your porch!      
From: Krystal H, Such a cute farm girl table!

From: Stephanie S. Cute stripes!

From: Gloria V. Go Texas!!!

From: Mary C. WOW! Paint and decals look really cool!

From: Sarah L Fit for a Queen!
 |


